Yesterday I trudged out to Cape Pillar.
Cape Pillar is on the Tasman Peninsula, about 120 km from Hobart.
I showed you on my write up of the Cape Hauy walk how to get to the peninsula, and also info on National Park fees, entry, etc.
There’s some really good information here about the area, and on the changing weather conditions.
Mobile Phone Coverage
The Cape Pillar walk was the only time I’d been on the Tasman Peninsula where I had no phone reception for about 95% of the trek. Both mine and my work mobile phones are with Telstra, and they generally cover most of the peninsula. Not so for this walk. Fortescue Bay the reception is fine, then I had very intermittent coverage on the old Cape Pillar track, and then again only at the end on the summit of The Blade did I get reception again.
The Trudge
Cape Pillar is a 30-odd kilometre trudge that you can do as a day walk (for idiots like me), or an overnight or longer walk for normal people.

If you’re looking for a first class trudging experience, you can do Cape Pillar as part of the Three Capes Track.
It’s possible to do the three capes by yourself for nothing more than the cost of park entry fees and petrol. However, I have to say (after seeing how well the participants are treated on these treks) the Three Capes Track is certainly something worth looking at if you’re not in the business of trudging so far in a day.
So once you’ve braved the dirt road into Fortescue Bay, where do you go?
I’m glad you asked.
About 100 metres before the ranger’s office at the Fortescue Bay camp ground, the old Cape Pillar Track starts and plunges into the forest.
Go in here.

Start here
And take note of the sign. It basically says don’t go in here unless you’re stupid and willing to admit it.

Don’t go here; too dangerous
The old trail is not as well-maintained as it could be. The track is well-marked; you can’t possibly get lost. Well, unless you leave the trail. But that would be pretty dumb, yeah?
I found that I had to get my gaiters out of my pack while walking the old trail. The mixture of traditional hiking trail (tree roots and rocks), duck-boarding and overgrown areas was about even.

Old trail

Old trail again
Apologies for the blurry pictures… I must have been shaking in my excitement of trudging out here.
Follow this trail until you get to an intersection a touch over 7km in.

Intersection
This is where the old meets the new. Put away your gaiters and walking poles, break out your comfy slippers… the new track is a red carpet ride through the bush. In fact, it’s so good it’s difficult for me to call it a bush walk…
Follow the trail to Cape Pillar.
And that’s it, the end.
Okay, so I can go into a bit more detail if you like.
At the intersection and just afterwards there are a couple of side treks for either the Three Capes walkers, or the folks who are looking for a freebie camp site. The track to Wughalee Falls camp area is the only camp site available for the trudgers who are not part of the Three Capes Walk.
About 2km past the intersection you will come across what is basically a hotel in the bush. It’s the Munro Campsite, for the Three Capes Trudging crew. It’s pretty nice. Here is the view from the deck back toward Cape Hauy.

to Cape Hauy and beyond
You will need to pass through the hotel grounds to continue on your trudge.

Bush hotel
Keep walking, and you will see more and more of the amazing coastline as you go.

Keep walking
And a frog pond. The frogs were noisy, but not immediately visible.

Frogs in a pond
There are lots of seats on the trail that you can use. But most are just pretty chairs. This one was a bit too weird, so I had to take a photo.

Weird chair
This sign is wonderful… if you approach to within 2 metres of a cliff’s edge, you will fall to your doom.

Fall down here
So don’t stand on the edges and take pictures looking straight down, or of your feet dangling over the edge.

Don’t do this

or this…
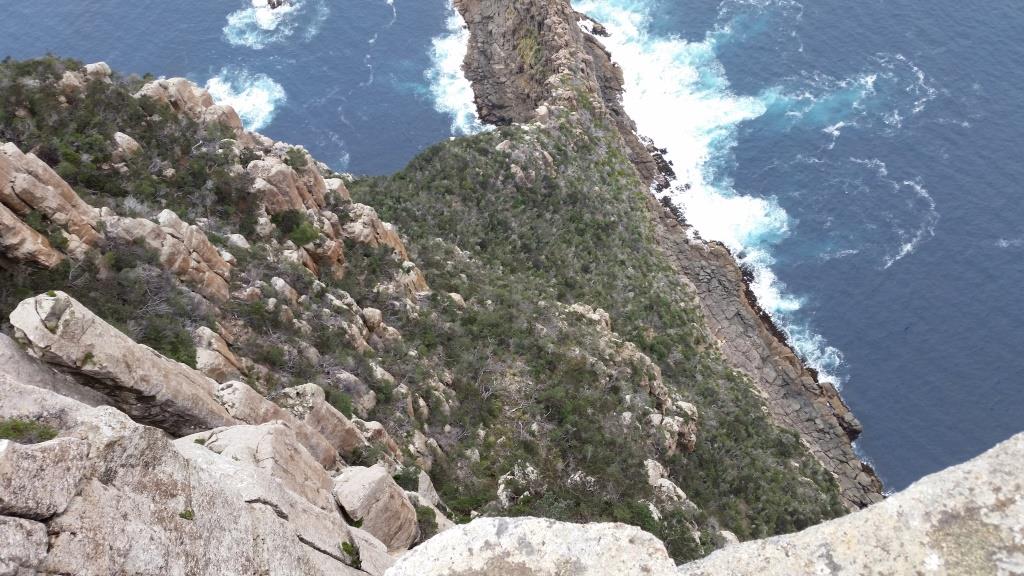
Like all the walks out this way, the further you go, the better the views become. The coastline is slowly revealed as you get closer to the end of the trail.

cliffs

Tasman Island starting to peek through…
Serious note about this walk. These cliffs are the highest sea cliffs in the Southern Hemisphere (according to Wikipedia). There are no fences, or any other protections to stop you from falling over the edge. It gets quite windy here, and even on a reasonably calm day the wind can gust suddenly and unexpectedly. Be careful.

the view down
and down

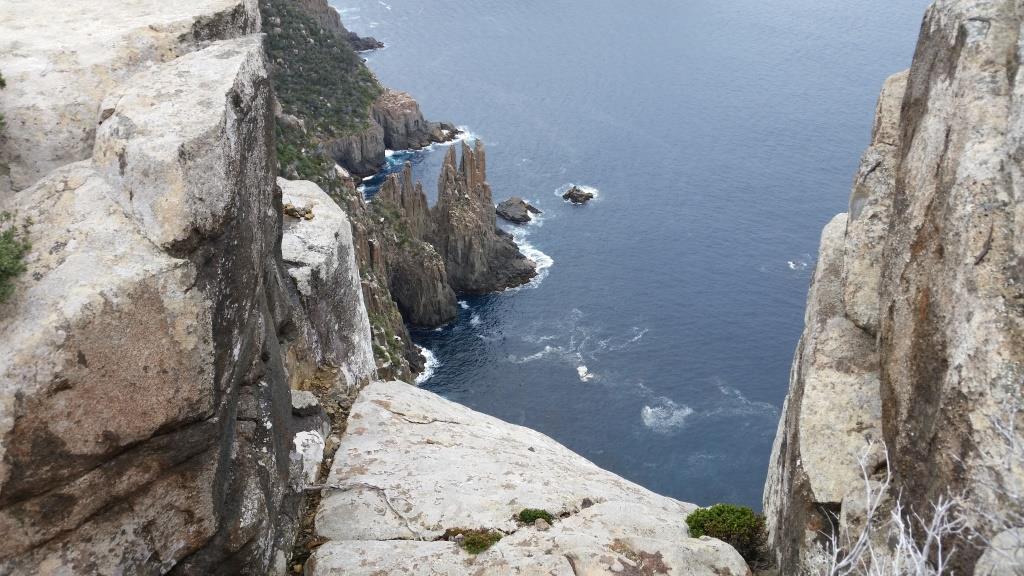
Cliffs
The cliffs here are over 300m high (nearly a thousand feet for those using Imperial measurements).

sea, rocks… and cliffs
Here’s what it looks like from the water. I took these pictures a few years ago.

Cape Pillar. The Blade is on the top right
And Tasman Island from the eastern side.

Tasman Island
Back on dry land, my walk continued…
The Trident

Cliffs
Once you’re over the awe of seeing these cliffs, keep going to the end. You can climb a formation called The Blade for even better views, especially of Tasman Island. This climb is harder than the rest of the trek. And be careful at the top; sudden wind gust abound, even on a reasonably calm day.

The Blade. This way…

Don’t go up here, it’s very dangerous

The view back (from The Blade). Yes, I went up regardless of the signs. And I ate lunch on the top. In the background to the top left you can see Cape Raoul.

Tasman Island again
If you feel adventurous, you can follow a side trail to a spot called The Chasm, further along the cape. I didn’t feel that adventurous (and was conscious of time and incoming weather), so I trudged back.
The Chasm can be reached via a small side trail below The Blade. From all reports it is quite a difficult trek. You can get right to the end and look down upon the formation of Cathedral Rock. Here’s what it looks like from the sea.

Cathedral Rock
… Not the same Cathedral Rock that sits just off Mount Wellington…
Now, you can walk back to your car (like I did), or to your campsite.
My GPS says I walked 32km. A very enjoyable trudge. I started at about 8.30 am and got back to my car at 5.30pm. The hike itself took just under 8 and a half hours, but I turned the tracker off while I ate lunch on The Blade.
Here is a link to my Endomondo workout
You should be able to scroll down into the map for a better idea of the trail.
Thanks for reading!
Pete

Hi Pete,
It was fun reading your post.
Do you know if you need to book the Wughalee falls camp or there will always be space for 2 more campers?
Thanks.
LikeLiked by 1 person
Hey Veronika,
Thanks for reading!
I’m not sure, to be honest. I believe its a ‘first in, best dressed’ kinda campsite. It may be worth contacting the park ranger at Fortescue.Bay@parks.tas.gov.au to enquire?
Cheers,
Pete
LikeLike
I like your description “Put away your gaiters and walking poles, break out your comfy slippers…” That was my experience as well. It feels a little “over-engineered”, and while there’s some fantastic scenery, I’d recommend it as a long day walk if you’re fit. And a great “starter walk” for families with young children or people with not much bushwalking experience.
My track notes and observations: https://hikingtheworld.blog/2017/01/14/three-capes-in-a-day/
LikeLike
Thanks Oliver! It was a great walk. I’ll do it again one day. The Cape Raoul (and Shipstern Bluff side trek) has recently been done up to match the over engineering, of the other tracks, as you say.
LikeLike
That’s good to know… so it’s really a Three Capes walk now, and not Two Capes 🙂
LikeLike
Hi, I am a reasonably fit 22 year old who just completed the old circuit a week ago. My girlfriend and I camped at Wughalee falls. Important things to note are:
1) The Wughalee falls track is only about fifteen/ twenty minutes, but there is an amount of elevation to get up and down into it.
Whilst not a super experienced hiker, I am reasonably fit at 22 and found that doing the side track four times to enter and exit for the night was quite a workout, even more so on my first entry and final exit with around 12/14kg of gear.
2) Our map showed that there is a more eastern path to climb most of Mount Fortescue which is accessible from the falls. This means you can bypass the Munroe huts.
We attempted this without any gear on and found it was quite overgrown and the path had deteriorated quite a bit. If you are camping and have gear, we would not recommend doing this older path to ascend Mt Fortescue unless you have gaiters and trekking poles.
3) There is a campsite at bare knoll! Getting to this campsite is a much easier walk than the falls with a minimal amount of elevation. I wish I knew this before we descended to the falls and set up.
4) Water. I was able to get water from Retakunna creek at the falls. There were four rain water tanks at the campsite which were empty. This leads me to believe that the creek still flows decently even in drier conditions.
LikeLiked by 1 person
I walked the 3 Capes track in a day yesterday. I returned over the Mt Fortescue route and only went down the Cape Hauy track, 56 steps, to take a photo – 39kms all up. It took me 10 hours and 10 minutes including breaks. I do this walk annually.. The day before I walked from Waterfall Bay to Bivouac Bay, return, about 24km (I think) along the Tasman Track. A really great cliffs walk too, and nobody on the track. It was a bit muddy in places, mostly walking to Camp Falls, which I’ve never seen before, but I usually go in summer. That walk took me 7 1/2 hours. Walking to Bivouac Bay return you don’t have to worry about getting back to your car and is more scenic than the rest of the walk to Fortescue Bay. There is good camping at Bivouac Bay if you want to do it over 2 days.
LikeLike